[C#] Valider vos formulaires tout en souplesse
On a tous au moins une fois, si ce n’est pas des dizaines, eu à implémenter une validation de données d’un formulaire. Dans les cas simples, on peut utiliser l’interface INotifyDataErrorInfo qui fonctionne plutôt bien. Par contre, elle est bien trop rigide pour des scénarios complexes. Je vous propose donc une solution que j’utilise qui est certes, plus longue à mettre en place, mais qui a pour avantage d’être vraiment très souple et qui s’intègre très bien dans les architectures logiciel d’aujourd’hui.
Architecture
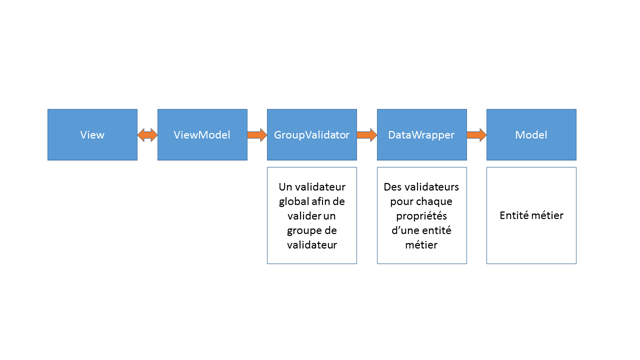
Ce schéma montre les briques essentielles que vont composer notre mécanisme de validation pour une application utilisant le modèle MVVM. Le ViewModel contiendra un validateur global qui sera chargé de lancer la validation des champs d’une entité métier selon leur règles de gestion propre. On pourra donc valider tout ou partie d’un formulaire mais aussi ne valider que certains champs spécifique ou l’intégralité de ceux-ci. L’utilisation d’un DataWrapper permettra de définir les règles de validation de chacun des champs et de gérer les messages d’erreurs.
Et concrètement ça donne quoi ?
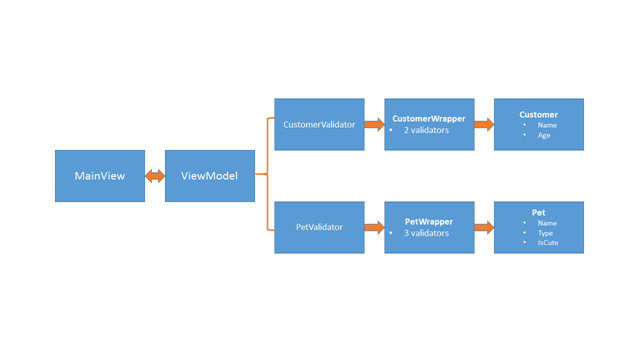
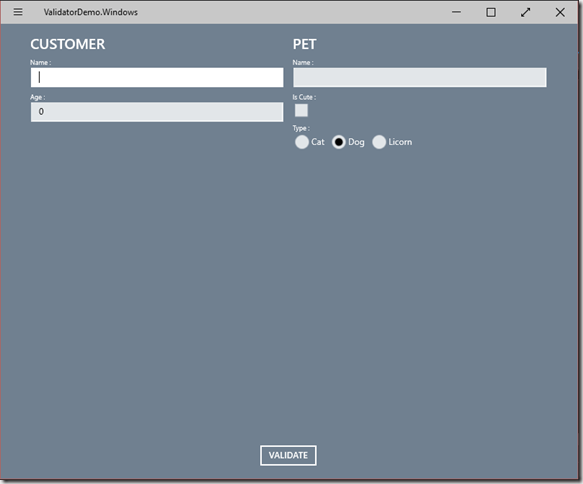
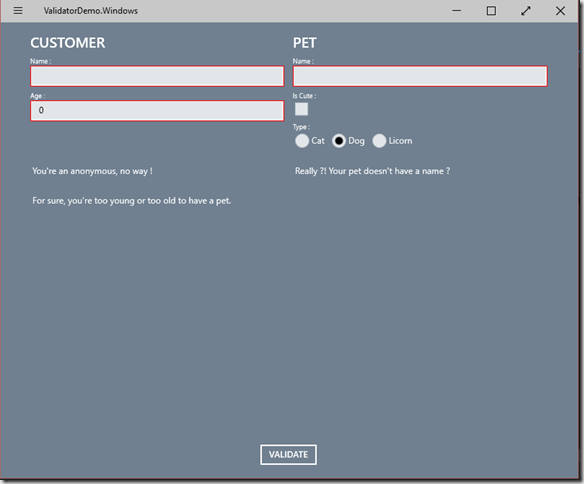
Rien de mieux qu’un exemple d’application pour mieux comprendre le fonctionnement de cette architecture. L’exemple portera sur une Universal Apps en C#/XAML ayant deux formulaires à valider.
Entités métier
1: namespace ValidatorDemo.Models
2: {3: public abstract class ModelBase
4: {5: public string Id { get; set; }
6: } 7: }1: namespace ValidatorDemo.Models
2: {3: public class Customer : ModelBase
4: {5: public string Name { get; set; }
6: 7: public int Age { get; set; }
8: } 9: }1: namespace ValidatorDemo.Models
2: {3: public enum PetType
4: { 5: Dog, 6: Cat, 7: Licorn 8: } 9: 10: public class Pet : ModelBase
11: {12: public string Name { get; set; }
13: 14: public PetType Type { get; set; }
15: 16: public bool IsCute { get; set; }
17: } 18: }Validator (Interfaces)
Un validateur est défini par une méthode pour lancer la validation (Validate), une fonction qui définit la validation selon des règles métier (Validator), une propriété permettant de savoir si la validation a réussie on non (IsValid) et une propriété qui correspond à l’objet à tester (Data).
1: using System;
2: 3: namespace ValidatorDemo.Common
4: {5: public interface IValidator<T>
6: { 7: T Data { get; set; } 8: 9: bool Validate();
10: 11: Func<T, bool> Validator { get; set; }
12: 13: bool IsValid { get; }
14: } 15: }ISingleValidator définit un validateur utilisé pour valider une seule donnée :
1: using System.Collections.ObjectModel;
2: 3: namespace ValidatorDemo.Common
4: {5: public interface ISingleValidator<T> : IValidator<T>
6: { 7: ObservableCollection<ValidatorMessage> Results { get; set; } 8: } 9: }IGroupValidator définit un validateur afin de valider un groupe de données :
1: using System.Collections.ObjectModel;
2: 3: namespace ValidatorDemo.Common
4: {5: public interface IGroupValidator<T> : IValidator<T>
6: { 7: ObservableCollection<ValidatorMessage> Results { get; set; } 8: 9: int Percent { get; set; }
10: } 11: }Validator (Implémentations)
Voici les implémentations des deux interfaces ISingleValidator et IGroupValidator. La validation est considéré comme valide si aucun message d’erreur n’apparait dans la liste des messages :
1: using System;
2: using System.Collections.ObjectModel;
3: using System.Linq;
4: 5: namespace ValidatorDemo.Common
6: {7: public sealed class SingleValidator<T> : ViewModelBase, ISingleValidator<T>
8: {9: private T _data;
10: public T Data
11: {12: get { return _data; }
13: set 14: {15: _data = value;
16: OnPropertyChanged("Data");
17: } 18: } 19: 20: public bool IsValid
21: { 22: get 23: { 24: var res = _results.All(error => error.Type != MessageType.Error);25: return res;
26: } 27: } 28: 29: private ObservableCollection<ValidatorMessage> _results;
30: public ObservableCollection<ValidatorMessage> Results
31: {32: get { return _results; }
33: set 34: {35: _results = value;
36: OnPropertyChanged("Results");
37: } 38: } 39: 40: public Func<T, bool> Validator { get; set; }
41: 42: public bool Validate()
43: { 44: Results.Clear(); 45: 46: if (Validator == null)
47: return true;
48: 49: var success = Validator(Data);50: OnPropertyChanged("IsValid");
51: return success;
52: } 53: 54: public SingleValidator()
55: {56: Results = new ObservableCollection<ValidatorMessage>();
57: } 58: } 59: }On notera la présence de la propriété Percent qui peut servir à ajouter un pourcentage de validation pour un groupe :
1: using System;
2: using System.Collections.ObjectModel;
3: using System.Linq;
4: 5: namespace ValidatorDemo.Common
6: {7: public abstract class GroupValidator<T> : ViewModelBase, IGroupValidator<T>
8: {9: private T _data;
10: public T Data
11: {12: get { return _data; }
13: set 14: {15: _data = value;
16: OnPropertyChanged("Data");
17: } 18: } 19: 20: public bool IsValid
21: {22: get { return _results.All(error => error.Type != MessageType.Error); }
23: } 24: 25: private int _percent;
26: public int Percent
27: {28: get { return _percent; }
29: set 30: {31: _percent = value;
32: OnPropertyChanged("Percent");
33: } 34: } 35: 36: private ObservableCollection<ValidatorMessage> _results;
37: public ObservableCollection<ValidatorMessage> Results
38: {39: get { return _results; }
40: set 41: {42: _results = value;
43: OnPropertyChanged("Results");
44: } 45: } 46: 47: public Func<T, bool> Validator { get; set; }
48: 49: public virtual bool Validate()
50: { 51: Results.Clear(); 52: 53: if (Validator == null)
54: return true;
55: 56: return Validator(Data);
57: } 58: 59: public virtual bool Refresh()
60: { 61: Results.Clear(); 62: 63: if (Validator == null)
64: return true;
65: 66: return Validator(Data);
67: } 68: 69: protected GroupValidator()
70: {71: Results = new ObservableCollection<ValidatorMessage>();
72: } 73: } 74: }DataWrapper (Interface)
L’interface ne contient qu’une seule méthode à implémenter. Il s’agit de la méthode GetModelFromWrapper qui permet de récupérer une instance de l’objet métier à partir des données du wrapper.
1: using ValidatorDemo.Models;
2: 3: namespace ValidatorDemo.Wrapper
4: {5: public interface IDataWrapper<T> where T : ModelBase
6: { 7: T GetModelFromWrapper(); 8: } 9: }DataWrapper (Implémentation)
Comme expliqué au début de l’article, l’ensemble des propriétés de la classe métier sont transformés en ISingleValidator ayant leur propre méthode de validation :
1: using ValidatorDemo.Common;
2: using ValidatorDemo.Models;
3: 4: namespace ValidatorDemo.Wrapper
5: {6: public class CustomerWrapper : IDataWrapper<Customer>
7: {8: public string Id { get; set; }
9: 10: public ISingleValidator<string> Name { get; set; }
11: 12: public ISingleValidator<int> Age { get; set; }
13: 14: public CustomerWrapper(Customer customer)
15: {16: Name = new SingleValidator<string>();
17: Name.Data = customer.Name; 18: Name.Validator = name => 19: {20: if (string.IsNullOrEmpty(name))
21: {22: Name.Results.Add(new ValidatorMessage
23: {24: Text = "You're an anonymous, no way !",
25: Type = MessageType.Error 26: }); 27: } 28: 29: return Name.IsValid;
30: }; 31: 32: Age = new SingleValidator<int>();
33: Age.Data = customer.Age; 34: Age.Validator = age => 35: {36: if (age < 7 || age > 77)
37: {38: Age.Results.Add(new ValidatorMessage
39: {40: Text = "For sure, you're too young or too old to have a pet.",
41: Type = MessageType.Error 42: }); 43: } 44: 45: return Age.IsValid;
46: }; 47: } 48: 49: public Customer GetModelFromWrapper()
50: {51: Customer customer = new Customer
52: { 53: Id = Id, 54: Name = Name.Data, 55: Age = Age.Data 56: }; 57: 58: return customer;
59: } 60: } 61: }1: using ValidatorDemo.Common;
2: using ValidatorDemo.Models;
3: 4: namespace ValidatorDemo.Wrapper
5: {6: public class PetWrapper : IDataWrapper<Pet>
7: {8: public string Id { get; set; }
9: 10: public ISingleValidator<string> Name { get; set; }
11: 12: public ISingleValidator<PetType> Type { get; set; }
13: 14: public ISingleValidator<bool> IsCute { get; set; }
15: 16: public PetWrapper(Pet pet)
17: {18: Name = new SingleValidator<string>();
19: Name.Data = pet.Name; 20: Name.Validator = name => 21: {22: if (string.IsNullOrEmpty(name))
23: {24: Name.Results.Add(new ValidatorMessage
25: {26: Text = "Really ?! Your pet doesn't have a name ?",
27: Type = MessageType.Error 28: }); 29: } 30: 31: return Name.IsValid;
32: }; 33: 34: Type = new SingleValidator<PetType>();
35: Type.Data = pet.Type; 36: Type.Validator = type => 37: {38: if (type == PetType.Licorn)
39: {40: Type.Results.Add(new ValidatorMessage
41: {42: Text = "Licorn doesn't exist, sorry dude.",
43: Type = MessageType.Error 44: }); 45: } 46: 47: return Type.IsValid;
48: }; 49: 50: IsCute = new SingleValidator<bool>();
51: IsCute.Data = pet.IsCute; 52: IsCute.Validator = isCute => 53: {54: if (!isCute && Type.Data == PetType.Cat)
55: {56: IsCute.Results.Add(new ValidatorMessage
57: {58: Text = "Are you sure ? Cats are always cut so check again please.",
59: Type = MessageType.Warning 60: }); 61: } 62: 63: return IsCute.IsValid;
64: }; 65: } 66: 67: public Pet GetModelFromWrapper()
68: {69: Pet pet = new Pet
70: { 71: Id = Id, 72: Name = Name.Data, 73: Type = Type.Data, 74: IsCute = IsCute.Data 75: }; 76: 77: return pet;
78: } 79: } 80: }GroupValidator (Implementation)
Le travail est pratiquement terminé, il ne reste plus qu’à créer nos validateurs d’ensemble :
1: using ValidatorDemo.Wrapper;
2: 3: namespace ValidatorDemo.Common.Validators
4: {5: public class CustomerValidator<T> : GroupValidator<T> where T : CustomerWrapper
6: {7: public CustomerValidator(T customer)
8: { 9: Data = customer; 10: } 11: 12: public override bool Validate()
13: { 14: Results.Clear(); 15: 16: Data.Name.Validate(); 17: Data.Age.Validate(); 18: 19: Results.AddRange(Data.Name.Results); 20: Results.AddRange(Data.Age.Results); 21: 22: return IsValid;
23: } 24: 25: public override bool Refresh()
26: { 27: Results.Clear(); 28: 29: Results.AddRange(Data.Name.Results); 30: Results.AddRange(Data.Age.Results); 31: 32: return IsValid;
33: } 34: } 35: }1: using ValidatorDemo.Wrapper;
2: 3: namespace ValidatorDemo.Common.Validators
4: {5: public class PetValidator<T> : GroupValidator<T> where T : PetWrapper
6: {7: public PetValidator(T pet)
8: { 9: Data = pet; 10: } 11: 12: public override bool Validate()
13: { 14: Results.Clear(); 15: 16: Data.Name.Validate(); 17: Data.Type.Validate(); 18: Data.IsCute.Validate(); 19: 20: Results.AddRange(Data.Name.Results); 21: Results.AddRange(Data.Type.Results); 22: Results.AddRange(Data.IsCute.Results); 23: 24: return IsValid;
25: } 26: 27: public override bool Refresh()
28: { 29: Results.Clear(); 30: 31: Results.AddRange(Data.Name.Results); 32: Results.AddRange(Data.Type.Results); 33: Results.AddRange(Data.IsCute.Results); 34: 35: return IsValid;
36: } 37: } 38: }Intégration dans le ViewModel
L’avantage de cette solution, c’est la mise en place dans le ViewModel. Une fois le validateur et le wrapper créé, il suffit de lier la classe métier au validateur et le tour est joué :
1: using ValidatorDemo.Common.Validators;
2: using ValidatorDemo.Models;
3: using ValidatorDemo.Wrapper;
4: 5: namespace ValidatorDemo
6: {7: public class MainViewModel : ViewModelBase
8: {9: #region Properties
10: 11: private CustomerValidator<CustomerWrapper> _customer;
12: public CustomerValidator<CustomerWrapper> Customer
13: {14: get { return _customer; }
15: set 16: {17: _customer = value;
18: OnPropertyChanged("Customer");
19: } 20: } 21: 22: private PetValidator<PetWrapper> _pet;
23: public PetValidator<PetWrapper> Pet
24: {25: get { return _pet; }
26: set 27: {28: _pet = value;
29: OnPropertyChanged("Pet");
30: } 31: } 32: 33: #endregion
34: 35: #region Constructor
36: 37: public MainViewModel()
38: {39: Customer = new CustomerValidator<CustomerWrapper>(new CustomerWrapper(new Customer()));
40: Pet = new PetValidator<PetWrapper>(new PetWrapper(new Pet()));
41: } 42: 43: #endregion
44: 45: #region Commands
46: 47: private RelayCommand _validateCommand;
48: public RelayCommand ValidateCommand
49: { 50: get 51: {52: if (_validateCommand == null)
53: _validateCommand = new RelayCommand(Validate);
54: return _validateCommand;
55: } 56: } 57: 58: #endregion
59: 60: #region Actions
61: 62: private void Validate()
63: { 64: Customer.Validate(); 65: Pet.Validate(); 66: } 67: 68: #endregion
69: } 70: }Au niveau de la View
Pour le binding, rien de plus simple ! On accède facilement à nos données grâce à la propriété Data :
1: <Page x:Class="ValidatorDemo.MainPage"
2: xmlns="http://schemas.microsoft.com/winfx/2006/xaml/presentation"
3: xmlns:x="http://schemas.microsoft.com/winfx/2006/xaml"
4: xmlns:d="http://schemas.microsoft.com/expression/blend/2008"
5: xmlns:mc="http://schemas.openxmlformats.org/markup-compatibility/2006"
6: xmlns:validatorDemo="using:ValidatorDemo"
7: xmlns:converters="using:ValidatorDemo.Converters"
8: mc:Ignorable="d">
9: 10: <Page.DataContext>
11: <validatorDemo:MainViewModel />
12: </Page.DataContext>
13: 14: <Page.Resources>
15: <converters:ErrorBrushConverter x:Key="ErrorBrushConverter" />
16: <converters:PetTypeEnumConverter x:Key="PetTypeEnumConverter" />
17: </Page.Resources>
18: 19: <Grid Background="SlateGray">
20: <Grid Margin="50,20">
21: <Grid.ColumnDefinitions>
22: <ColumnDefinition />
23: <ColumnDefinition Width="15" />
24: <ColumnDefinition />
25: </Grid.ColumnDefinitions>
26: <Grid.RowDefinitions>
27: <RowDefinition Height="Auto" />
28: <RowDefinition Height="20" />
29: <RowDefinition />
30: <RowDefinition Height="Auto" />
31: </Grid.RowDefinitions>
32: 33: <!-- Customer form -->
34: <Grid VerticalAlignment="Top">
35: <Grid.RowDefinitions>
36: <RowDefinition Height="Auto" />
37: <RowDefinition />
38: <RowDefinition />
39: </Grid.RowDefinitions>
40: 41: <TextBlock Text="CUSTOMER"
42: FontSize="24"
43: FontWeight="SemiBold" />
44: 45: <StackPanel Grid.Row="1"
46: Orientation="Vertical"
47: Margin="0,10,0,0">
48: <TextBlock Text="Name :" />
49: 50: <Border BorderThickness="1"
51: BorderBrush="{Binding Customer.Data.Name.IsValid, Converter={StaticResource ErrorBrushConverter}}">
52: <TextBox Text="{Binding Customer.Data.Name.Data, Mode=TwoWay}" />
53: </Border>
54: </StackPanel>
55: 56: <StackPanel Grid.Row="2"
57: Orientation="Vertical"
58: Margin="0,10,0,0">
59: <TextBlock Text="Age :" />
60: 61: <Border BorderThickness="1"
62: BorderBrush="{Binding Customer.Data.Age.IsValid, Converter={StaticResource ErrorBrushConverter}}">
63: <TextBox Text="{Binding Customer.Data.Age.Data, Mode=TwoWay}" />
64: </Border>
65: </StackPanel>
66: </Grid>
67: 68: <!-- Pet form -->
69: <Grid Grid.Row="0"
70: Grid.Column="2"
71: VerticalAlignment="Top">
72: <Grid.RowDefinitions>
73: <RowDefinition Height="Auto" />
74: <RowDefinition />
75: <RowDefinition />
76: <RowDefinition />
77: </Grid.RowDefinitions>
78: 79: <TextBlock Text="PET"
80: FontSize="24"
81: FontWeight="SemiBold" />
82: 83: <StackPanel Grid.Row="1"
84: Orientation="Vertical"
85: Margin="0,10,0,0">
86: <TextBlock Text="Name :" />
87: 88: <Border BorderThickness="1"
89: BorderBrush="{Binding Pet.Data.Name.IsValid, Converter={StaticResource ErrorBrushConverter}}">
90: <TextBox Text="{Binding Pet.Data.Name.Data, Mode=TwoWay}" />
91: </Border>
92: </StackPanel>
93: 94: <StackPanel Grid.Row="2"
95: Orientation="Vertical"
96: Margin="0,10,0,0">
97: <TextBlock Text="Is Cute :" />
98: 99: <Border BorderThickness="1"
100: BorderBrush="{Binding Pet.Data.IsCute.IsValid, Converter={StaticResource ErrorBrushConverter}}">
101: <CheckBox IsChecked="{Binding Pet.Data.IsCute.Data}" />
102: </Border>
103: </StackPanel>
104: 105: <StackPanel Grid.Row="3"
106: Orientation="Vertical"
107: Margin="0,10,0,0">
108: <TextBlock Text="Type :" />
109: 110: <Border BorderThickness="1"
111: BorderBrush="{Binding Pet.Data.Type.IsValid, Converter={StaticResource ErrorBrushConverter}}">
112: <StackPanel Orientation="Horizontal">
113: <RadioButton IsChecked="{Binding Pet.Data.Type.Data, Mode=TwoWay, Converter={StaticResource PetTypeEnumConverter}, ConverterParameter=Cat}"
114: Content="Cat" />
115: 116: <RadioButton IsChecked="{Binding Pet.Data.Type.Data, Mode=TwoWay, Converter={StaticResource PetTypeEnumConverter}, ConverterParameter=Dog}"
117: Margin="10,0,0,0"
118: Content="Dog" />
119: 120: <RadioButton IsChecked="{Binding Pet.Data.Type.Data, Mode=TwoWay, Converter={StaticResource PetTypeEnumConverter}, ConverterParameter=Licorn}"
121: Margin="10,0,0,0"
122: Content="Licorn" />
123: </StackPanel>
124: </Border>
125: </StackPanel>
126: </Grid>
127: 128: <!-- Customer messages -->
129: <ScrollViewer Grid.Row="2"
130: Grid.Column="0">
131: <ListView ItemsSource="{Binding Customer.Results}">
132: <ListView.ItemTemplate>
133: <DataTemplate>
134: <TextBlock Text="{Binding Text}" />
135: </DataTemplate>
136: </ListView.ItemTemplate>
137: </ListView>
138: </ScrollViewer>
139: 140: <!-- Pet messages -->
141: <ScrollViewer Grid.Row="2"
142: Grid.Column="2">
143: <ListView ItemsSource="{Binding Pet.Results}">
144: <ListView.ItemTemplate>
145: <DataTemplate>
146: <TextBlock Text="{Binding Text}" />
147: </DataTemplate>
148: </ListView.ItemTemplate>
149: </ListView>
150: </ScrollViewer>
151: 152: <Button Grid.Row="3"
153: Grid.Column="0"
154: Grid.ColumnSpan="3"
155: Content="VALIDATE"
156: HorizontalAlignment="Center"
157: Command="{Binding ValidateCommand}" />
158: </Grid>
159: </Grid>
160: </Page>
Conclusion
Cette solution, bien que plus longue à mettre en place que l’utilisation de INotifyErrorDataInfo, permet vraiment de faire de la validation personnalisé grâce à la souplesse des IValidator.
Les sources du projet sont disponibles ici : http://1drv.ms/1DdLglU ![]()


Commentaires